
We will be learning how to make the flappy bird game on Scratch, a block-based language programming platform where kids can code to create their own animations and games. Let’s now jump to the steps you’ll need to create the game.
Step-By-Step Guide: How to Make a Flappy Bird in Scratch?
To make this game, we will be using Scratch as mentioned above. It is a popular platform in the coding world as kids can learn basic coding concepts with Scratch by programming different games. Today, we will be learning how to make the flappy bird game by following the mentioned steps!
1. Choose a Background
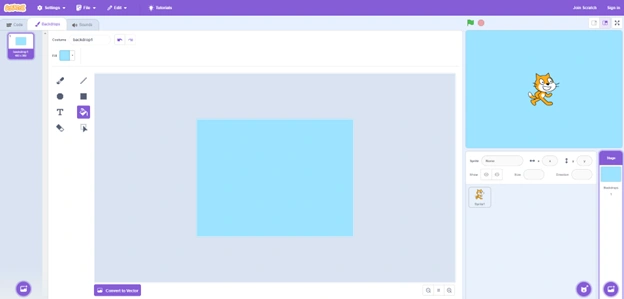
We need to start by choosing a background for our game! Simply, click on the “Stage” to open the stage editor. Now, choose a backdrop that can match the theme for your game. You can choose a sky, starry night or any landscape.
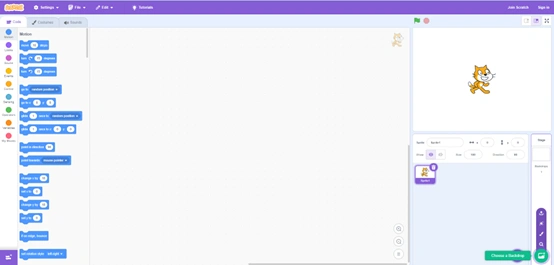
For the flappy bird game, we can also go for a simple blue background which could act as our blue sky.
2. Pick your Character
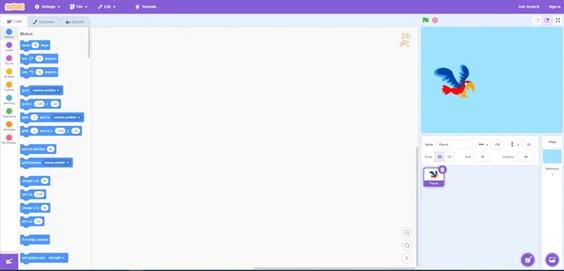
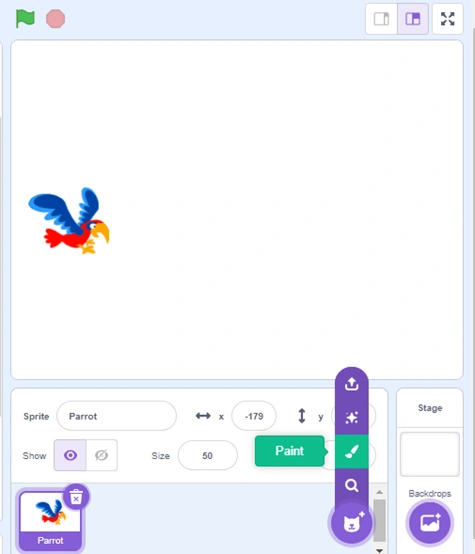
The next step creating a video game in scratch is adding characters also known as sprites to your game . You can choose these from the Scratch library or create your own. Select the” Choose a sprite” button and select the one you want. We are choosing the parrot for this since it is a flappy “bird” game.
3. Coding the Sprite
Our next and most important step is to add code to the game which is going to make it work. Our aim is that whenever the game starts, the bird keeps falling unless the player presses the space bar. It is like the concept of gravity, as it makes everything fall from the sky.
The following code will be applied to mimic the gravity effect in the game:
![]()
We start with “when the green flag is clicked” block from Events. Then attach the “forever” block from Control as we want this flappy motion to repeat if the game is going. Then, inside “forever”, we place the “if/then/else’ block from control.
We control the flappy motion through the spacebar, the user hits the space bar, the bird will go up. We want the condition for the if statement to be the sensing block “when space key pressed”.
Furthermore, we want the bird to go up. We will use the “change by y” Motion block and set its number to 20. We also want the birds costume to change so it looks like it’s flying thus we want to use the “switch costume to parrot-b” Looks block.
Moreover, the else condition guides us what happens if we do not press the space bar. It means the parrot should start falling to do this, under the else part of the block we will need the “change y by –5″ motion block.
To still make the parrot look like it’s flying, we add the “switch costume to parrot-a” block that alternates costumes.
4. Adding the Obstacles
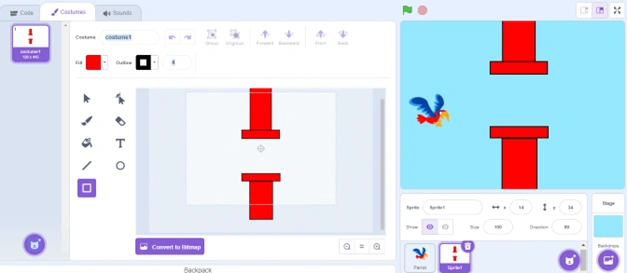
To make our game challenging, our parrot must dodge obstacles otherwise it’s too easy. We will be adding the pillars but since they are not a part of scratch, we’ll have to create them ourselves by making a custom sprite. Select the paint brush option by hovering over the sprite circle in the bottom right corner.
Next, you can use the “rectangle” icon from the last option in the first row to draw a pillar sprite. See below for a reference on how we created the obstacles.
5. Background for the End of the Game
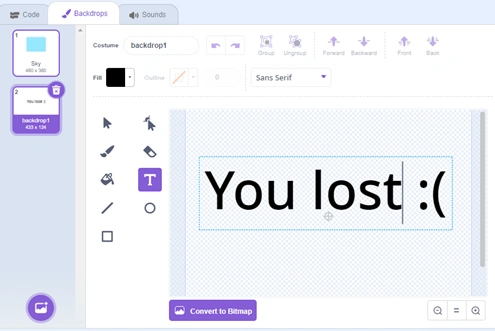
A custom background is needed that indicates the end of the game. Like we did before, go to the bottom right corner to add a background and choose the paintbrush option.
Then, use the text option in the second column to display the message that shows the game has ended. You can also write “try again” or “You lost 🙁” whichever works best for you.
6. Code the Obstacles to End the Game
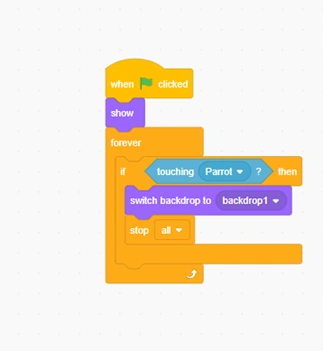
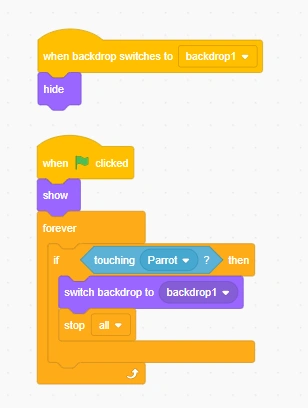
Click on the obstacle sprite to add code for them. We want to stop the game when the parrot touches the obstacle sprite. We will use the block “when green flag is clicked” from Events and underneath, we will add the “Forever” block from Control since we want this option to always repeat.
We need to always check whether the parrot has collided with the obstacle, we will add the “if/then” block from Control inside the “forever”.
The condition for the if statement will include the “touching parrot” block from Sensing. Make sure to change the dropdown choice to show that your obstacles and sprite are touching.
Then when this happens, we go to Looks and use “switch backdrop to backdrop1” to show that the game has ended and then use the Control block to “stop all”.
7. Coding for the Starting and Ending for the Game
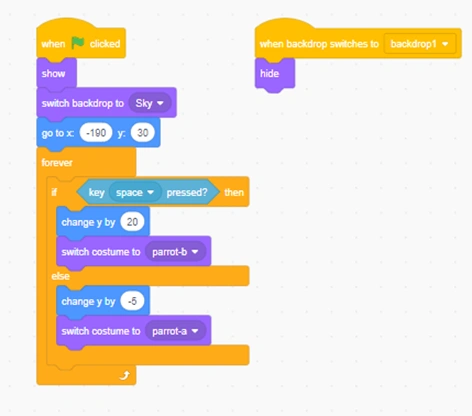
Now that we have a new backdrop, let’s go back to the parrot code and make some adjustments. “When backdrop switches to backdrop1” is the new Event block we’ll add and then also attach the “hide” block from Looks should then be attached as we don’t want anything else to show up once the game is over.
Then we are going to add a little more code in between the “when green flag clicked” and “forever” parts from before.
The “show” Looks block is what we need first as it ensures that the parrot appears back at the beginning of the game when it starts again. Next, we need to add a new Looks block called “switch backdrop to Sky.” By doing this, the game’s ending backdrop will vanish.
We then want to use the Motion block that says “go to x/y.” This will determine where the parrot will start. Make sure the parrot starts on the left side of the screen and somewhere in the middle of the screen vertically. Don’t worry about the exact coordinates, you can the ones we did. We choose y = 30 and x = -190.
Click on the obstacle sprite to add more blocks to add more code. We want the obstacles to vanish at the end of the game, just like we did with the parrot. The blocks “when backdrop switches to backdrop1” and “hide” can be used to do this.
Place the “show” Looks block between the previously inserted “when green flag clicked” and “forever” blocks to display the pillars when the game launches again.
8. Making the obstacles Move across the screen
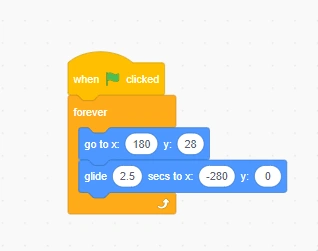
Now coming to the next task which is getting the pillars to move across the screen. Since we started with obstacles from the right side, we will make them move left.
Let’s get the “forever” block from Control and a “when green flag clicked” block from Events. We want the obstacles to move if the game is going.
Then we add the “go to x/y” Motion block inside “forever.” This will return our obstacles to their initial positions.
To start the blocks on the right size, we set x to 180 and y to 28. After that, we take a Motion block to make them move. Select “glide to x/y” and feel free to experiment with the time; we’ve set it at 2.5 seconds.
9. Creating a Score variable
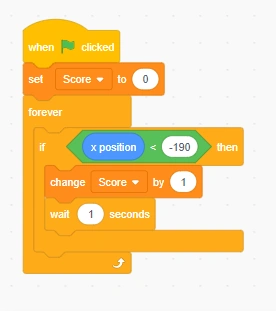
The final step is to create a score variable to keep track of the score. Go to the Variables tab, click “Make a Variable,” name it “Score,” and get a “when green flag clicked” Events block since we will track the score from the beginning of each game.
Then the first Variables block we want is “Set Score to 0,” it will reset the score at the beginning of each game; you may need to adjust the dropdown option to ensure that “Score” is selected. Next, get the two Control blocks, labeled “forever” and insert “if/then” inside of them.
In the if statement, the condition is when the parrot has flown through the obstacles. The parrot sprite only moves vertically and in the if condition we can detect whether the obstacles move past the parrot’s position by using the “<” block from Operators.
The “x position” block from Motion will go in the left area, while -190 will go in the right. This will determine when the parrot’s x location has been passed by the obstacles.
Furthermore, inside the “if/then” statement block, we will add the “change score by 1” block from Variables as we want the score to increase every time the parrot goes through.
We also add the “wait 1 second” block from Control to ensure the score will update once the parrot flies through the obstacles. Please see the code script below to understand better:
10. Play your Game!
Finally, you’re all done! You have successfully created your own flappy bird game on scratch; you can now play your game and share it with your friends or family so they play too!
Go ahead and customize your game with different characters or backgrounds if you want to change it up a little.
Moreover, feel free to contact us at https://khiredkids.com/ where we guide you on the basics and uses of Scratch coding to help you develop more games!
0 Comments